
39,95 € Original price was: 39,95 €.20,00 €Current price is: 20,00 €.
In stock
A1 Artists First Transfer Folk Element
A decorative folk-art design featuring symmetrically arranged flowers and birds. Perfect for furniture and creative projects with a distinctive folk-art feel.
Size:
59.4 × 84.1 cm
8 × DIN A4 sheets = total size DIN A1
Have you tried this yet? 🎨
Tell us how it went—your experience can help other creative minds!
With A1 transfers from Grace on Design and Mint by Michelle, you can customize furniture, walls, and DIY projects. The thin transfer films are applied to the prepared surface, creating decorative designs with a hand-painted look. The versatile motifs—ranging from romantic flowers to modern patterns—offer countless possibilities for your creative projects. Depending on the surface and proper preparation, the transfers are suitable for materials such as wood, glass, ceramics, or metal. Give your projects a truly personal, creative touch with A1 transfers! ✨
Please note that the colors displayed on your screen may vary depending on the screen resolution and color reproduction. It can therefore not be guaranteed that the shades of the colors will appear exactly as shown online.
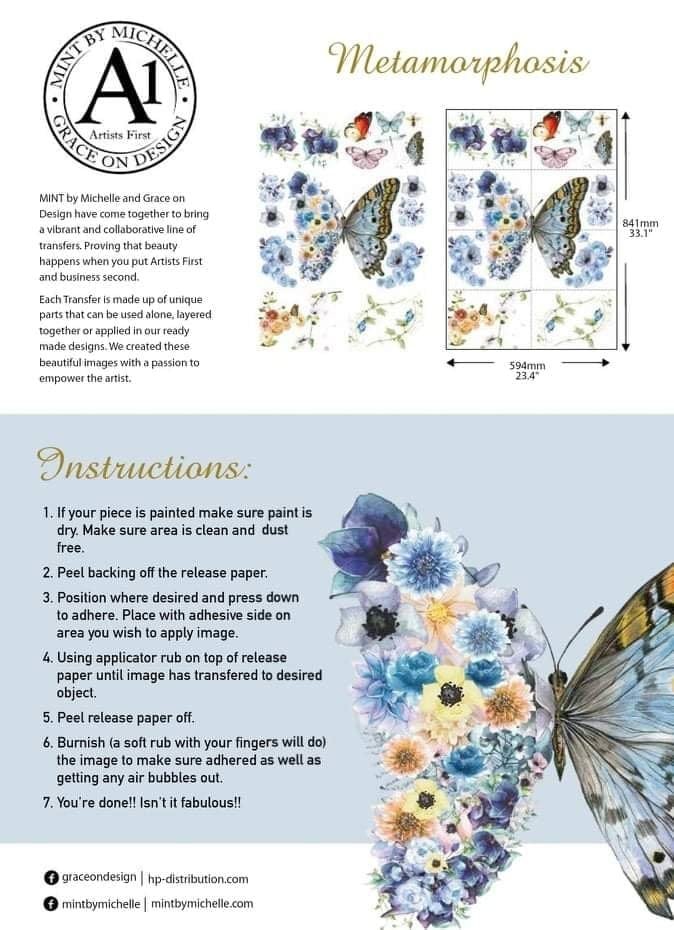
A1 Artists First Transfer Metamorphosis
In “Metamorphosis,” butterflies and flowers come together to create a richly detailed floral design with a wonderfully whimsical look.
Size:
59.4 × 84.1 cm
8 × DIN A4 sheets = Total size DIN A1
A1 Artists First Transfers are scratch-off transfers for creatively decorating a variety of surfaces. Depending on the project, the individual designs can be used together or separately and arranged as desired.
Perfect for furniture, home decor, and other creative projects that you want to give a floral, eye-catching touch.
Surface preparation for transfers (furniture transfers, scratch-off transfers, self-adhesive films):
Step-by-step instructions for using A1 Transfers:
Tips:
Once the decal has been applied, you’ll need to be patient:
After applying the transfer, let your project sit for at least 24 hours or overnight before continuing with further processing or sealing.
Depending on the project and the level of wear and tear, it is recommended to apply a suitable sealant to provide additional protection for the finished surface.
The perfect finish:
For projects subject to heavier wear or surfaces that may come into contact with moisture, the sealant should be selected based on the specific application. Depending on the project, suitable options include, for example, Extra Coat or Gator Hide be suitable.
But be careful! Gator Hide and Extra Coat can react with the adhesive layer of the transfer when applied directly to it, causing parts of the transfer to peel off. If you want to use one of these sealants, first apply a suitable standard top coat. Let it dry or cure according to the manufacturer’s instructions, and then apply Gator Hide or Extra Coat.
By using a sealant tailored to your specific project, you can provide additional protection for the finished surface and give your transfer project the desired finish.
Care Tips for Your Transfer Film Project
With the right care, you can protect the surface of your favorite item—decorated with transfer foil—and enjoy it for a long time.
1. gentle cleaning
2. protection from moisture
3. Protect the surface from damage
4. refresh if necessary
5. Protection from direct sunlight
With these simple care tips, your custom transfer foil project will remain a real eye-catcher. You can find more inspiration and materials for your DIY projects in our online store.
| Suitable Surfaces | Wood, metal, glass, ceramic, walls, fabric, leather, faux leather, plastic, and cardboard |
| Application | Indoors; outdoors only if properly sealed |
| Application temperature | 12–28 °C |
| Self-adhesive | Yes |
| Sealant | Yes (water-based sealant) |
| Size | See description |
Mint By Michelle
403 Pakington St
Newtown VIC 3220
Australien
admin@mintbymichelle.com
Dress it up
Wagenmakersplein 3
1211SB Hilversum
Niederlande
info@dressitup.nl
 A1 Artists First Transfer Metamorphosis
Sorry, no reviews match your current selections
| Weight | 0,25 kg |
|---|

incl. 19% VAT
zzgl. Versandkosten
Lieferzeit: 3-5 Werktage
Produkt enthält: 1 Stück
Add to cart
incl. 19% VAT
zzgl. Versandkosten
Lieferzeit: 3-5 Werktage
Produkt enthält: 1 Stück
Add to cart
incl. 19% VAT
zzgl. Versandkosten
Lieferzeit: 3-5 Werktage
Produkt enthält: 1 Stück
Add to cart
incl. 19% VAT
zzgl. Versandkosten
Lieferzeit: 3-5 Werktage
Produkt enthält: 1 Stück
Add to cartThat's why I rely on high-quality, tried-and-tested materials that give you the best results
Sign up for my newsletter and stay up to date.
I share new products, creative trends, helpful tutorials and exclusive offers with you.
You can easily unsubscribe at any time – via the link in the footer of every email or by sending me a message. You can find the relevant contact details in the imprint or directly in the newsletter.
Sign up for my newsletter and stay up to date.
I share new products, creative trends, helpful tutorials and exclusive offers with you.
You can easily unsubscribe at any time – via the link in the footer of every email or by sending me a message. You can find the relevant contact details in the imprint or directly in the newsletter.


